GstarCAD 2025 Complete Features Guide
GstarCAD 2025 Complete Features Guide
Contents
- #Excellent Performance
- #Perfect Compatibility
- #Flexible Licensing
- #Innovative Features
- #What's New in GstarCAD 2025
- #Parametric Constraints New
- #Hardware Acceleration New
- #3D Mouse Device Adaption New
- #Voice Annotation New
- #BIM Data Editing New
- #Break at Point New
- #DWGUNITS New
- #Application Manager New
- #API Innovative
- #DIM Improvement
- #3D Model Import/Export Improvement
- #File & Layout Tab Bar Improvement
- #Lasso Selection Improvement
- #UNDO Improvement
- #Batch Plot Improvement
- #QR Code Improvement
- #PASTESPEC Improvement
- #License Manager Improvement


GstarCAD 2025 Complete Guide
Elevating Performance, Empowering Design
GstarCAD 2025 elevates performance to a new level with Hardware Acceleration and other improvements on a series of features, significantly enhances the design experience. Exciting new features, including Parametric Constraints, BIM Data Editing, and Voice Annotation, etc., further enrich functionality. What’s more, compatibility has been expanded with the addition of Python support, empowering more robust customization and automation. Without further ado, let's explore these exciting updates!
Excellent Performance
Higher performance plays an important role in GstarCAD. GstarCAD not only constantly provides users with more useful functions, but also delivers great performance in both 2D and 3D operations.
The performance of commonly-used operations like "OPEN", "QSAVE", "PLOT", "CLIP", "TRIM", "PASTE", "MOVE", "DYNAMIC SELECTION", and more commands are significantly faster than other CAD software. Large drawings could be opened more quickly and your work can be saved in only a fraction of a second.
The chart below provides an overview of the performance of GstaCAD 2025. We built an operation speed comparison of the basic features between GstarCAD and other CADs. Two drawings were used to test the operation time, one was around 48 MB and another was around 114 MB. To make sure the data validation, the same operations were tested twice and got the average value.
Chart 1 — GstarCAD 2025 / GstarCAD 2024

| Operation | GstarCAD 2025 | GstarCAD 2024 |
|---|---|---|
| CTRL+C | 33 | 39 |
| Mirror | 6.3 | 8.87 |
| Undo | 1.4 | 1.8 |
| Regen | 2.3 | 3.05 |
| Move | 6.29 | 8.19 |
| Open | 7.25 | 10.59 |
Chart 2 — GstarCAD 2025 / ACAD 2025
| Operation | GstarCAD 2025 | ACAD 2025 |
|---|---|---|
| CTRL+C | 26.88 | 51.82 |
| Mirror | 5.35 | 15.74 |
| Redo | 5.86 | 6.88 |
| Undo | 4.47 | 8.72 |
| Move | 5.51 | 15.79 |
| Open | 4.23 | 5.77 |
Testing Environment: WIN10 64bit; 16G storage; CPU: Intel i5-4430 Testing Environment: WIN11 64bit; 16G storage; CPU: Intel i7-1165G7
Chart 3 — GstarCAD 2025 / ZCAD 2025

| Operation | GstarCAD 2025 | ZCAD 2025 |
|---|---|---|
| Mirror | 25.42 | 33.31 |
| Regen | 1.45 | 5.15 |
| Redo | 4.89 | 9.3 |
| Undo | 4.8 | 10.19 |
| Move | 4.97 | 9.74 |
| Open | 4.61 | 7.09 |
Chart 4 — GstarCAD 2025 / BCAD 2024
| Operation | GstarCAD 2025 | BCAD 2024 |
|---|---|---|
| CTRL+C | 19.28 | 48.36 |
| Mirror | 5.65 | 10.47 |
| Regen | 1.03 | 1.71 |
| Save | 6.02 | 8.26 |
| Move | 5.3 | 9.08 |
| Open | 3.7 | 4.48 |
Testing Environment: WIN10 64bit; 16G storage; CPU: Intel i5-10400 Testing Environment: WIN11 64bit; 16G storage; CPU: Intel i5-11400
It’s obvious that GstarCAD 2025 is faster than other CAD software when executing OPEN, MOVE, UNDO, REDO, MIRROR, REGEN, SAVEAS and CTRL+C commands. And it is extremely good when executing COPY TO CLIPBOARD command. Besides the chart, GstarCAD also works excellently in ARRAY and EXPLODE commands, while the other CADs couldn’t even array objects in the same drawing. Additionally, executing EXPLODE with the other CAD software wouldn't get a response for a long time. Compared with other CAD software, GstarCAD is far ahead in performance, especially when it comes to large drawings.
Perfect Compatibility
GstarCAD delivers high compatibility with ACAD and provides robust APIs. The seamless data format, familiar interface, command structure and user operating habit ensure an easy transition, while the powerful APIs allow for extensive customization and automation, empowering you to tailor the software to your specific needs.
- Data Format
GstarCAD 2025 supports the native DWG/DXF file formats which are completely compatible with ACAD from version 2.5 to 2024. Any CAD drawings based on the DWG/DXF format can be easily processed by GstarCAD. Meanwhile, the drawings created by GstarCAD also can be processed by other CAD software. GstarCAD 2025 fully realizes bidirectional compatibility with ACAD in data formats.
Furthermore, GstarCAD 2025 even supports various kinds of data file formats and application development interfaces. You could create or edit drawings in completely original ways.

The main file formats and development interfaces between GstarCAD and ACAD.
| Items | GstarCAD | ACAD |
|---|---|---|
| 2.5-2018 DWG/DXF Versions | √ | √ |
| Drawing Template File (DWT) | √ | √ |
| Drawing standard File (DWS) | √ | √ |
| Customize User interface file (CUI/CUIX) | √ | √ |
| Old Menu File (MNU) | √ | √ |
| Drawing Sheet Set File (DST) | √ | √ |
| Hatch Pattern File (PAT) | √ | √ |
| Font File (SHX) | √ | √ |
| Line Type File (LIN) | √ | √ |
| Print Style File (CTB/STB) | √ | √ |
| Import and Export WMF | √ | √ |
| Import and Export SAT | √ | √ |
| Import 3DS | √ | √ |
| Import DGN | √ | √ |
| Export DWF/DWFX | √ | √ |
| Export STL | √ | √ |
| Export EMF | √ | √ |
| DWF Underlay | √ | √ |
| PDF Underlay | √ | √ |
| DGN Underlay | √ | √ |
| Script File (SCR) | √ | √ |
| LISP Development Interface | √ | √ |
| LSP File Loading | √ | √ |
| FAS File Loading | √ | √ |
| VLX File Loading | √ | √ |
| VBA Development Interface | √ | √ |
| Class ARX Development Interface | √ | √ |
| .net Development Interface | √ | √ |
- Concise User Interface
GstarCAD 2025 offers you a concise and familiar interface. The combination of attractive dark color theme and icon designs helps reduce your eyestrain. It’s also available for you to display and rearrange elements like the toolbars, display the command bar, switch between workspaces, change the interface themes, customize your own interface and enable the status bar. The toolbars and command bar can also be floated anywhere on the screen or docked as well.

- Familiar Command
You can get started with GstarCAD immediately with the familiar command structure and shortcut system that you have known without extra learning. Whether you're a novice user or an experienced CAD professional, you can quickly start creating drawings using the productivity-enhancing features of GstarCAD.
| GstarCAD Commands | ACAD CommandsGstarCAD Commands | ACAD Commands | |
|---|---|---|---|
| Multiple | Multiple | Superhatch | Superhatch |
| Osnap | Osnap | Redraw | Redraw |
| Qselect | Qselect | Regen | Regen |
| Qleader | Qleader | Scalelistedit | Scalelistedit |
| Spell | Spell | Bedit | Bedit |
| Layerp | Layerp | Render | Render |
| Layoff | Layoff | Flatshot | Flatshot |
| …… |
- Customized Settings
GstarCAD offers several methods to import your customized settings such as CUI, Lisp program, Shortcut settings, Blocks, DWT, Tool palettes, Plotters and more from other CAD software. In just a few minutes, you can recreate the interface that you’re familiar with in GstarCAD.
- API and Add-ons
GstarCAD offers friendly development interfaces such as Python, GRX, .NET, VBA, Lisp, COM, etc. Nowadays, hundreds of professional applications and industrial solutions are running on GstarCAD.
For more information about applications/add-ons of GstarCAD, please refer to the link:
https://www.gstarcad.net/application/
Flexible Licensing
Licensing Policy
GstarCAD’s licensing policy is flexible and simple. We provide both perpetual license and subscription. You are free to choose the license mode and you decide when to upgrade.
- Perpetual License
When you choose to buy GstarCAD Perpetual License, you have the right to use it perpetually. Buy it once and it’s forever yours. You are not forced to buy the subscription or upgrades.
- Perpetual License and Subscription Plans
You can buy GstarCAD Perpetual License together with Subscription Plans. Gstarsoft releases a new GstarCAD major version every year, with Subscription Plans you can upgrade to the latest version of GstarCAD.
- Yearly Subscription
GstarCAD Yearly Subscription is similar to ACAD Subscription; you can just pay a smaller amount for GstarCAD’s 1-year license.
- GstarCAD Upgrades
Gstarsoft releases a new GstarCAD major version every year; you can upgrade your GstarCAD Perpetual License to the Perpetual License of any newer version!
Licensing Options
GstarCAD not only provides a flexible licensing policy, but also provides flexible licensing Options. GstarCAD offers Stand-alone and Network licenses, both are available with Soft key (Serial number) and Dongle (USB-key).
- Stand-alone license
The software is constrained to a certain host. A license is needed for each computer on which the software will be installed.
- Network license
A pool of licenses is available on the server, for users of any computers on the network. You only need to have licenses for the maximum number of simultaneous users expected, not for each computer where the software will be installed.

Innovative Features
GstarCAD offers over 100 unique and innovative tools like “Collaboration”, “Area Table”, “Auto Layer”, “Viewport to Layout”, and “Autoxlstable”. They are adopted to significantly speed up your drafting speed.
| GstarCAD Innovative Features | Description |
|---|---|
| Autolayer | Automatically switch the current layer while drawing the graph and draws the graphic to the set layer. |
| Area Table | Automatically dimension and count the area of an enclosed object and export the result to a table in the current drawing area. |
| Break Object | Breaks Objects by intersecting lines and allows to set the gap. |
| Block Break | Breaks or shelters the graphic under the block. |
| Graphic Compare | Compares graphic of two groups of objects or two files. |
| Line2pl | Converts one or multiple connected straight line(s), arc(s) to one polyline. |
| Sptpl | The spline created can be converted to a polyline according to the accuracy (number of segments of the arc). |
| GstarCAD Tools | A set of GstarCAD practical tools to enhance design efficiency, Including Drawing Scale, Rotate Cursor, Draw Axonometric Line, Extension, Normal Connect, etc. |
| Drawing Lock | Turns the drawing into a whole block to prevent being modified by others. |
| Attribute Increment | Specifies attribute of blocks with incremental value, and modifies attribute value of blocks according to the sort method. |
| Define Layout Viewport from Model Space(M2LVPORT) | Defines the range of drawing displayed in the viewport from the model space, calculates the viewport size based on the set scale and positions the viewport in the layout space. |
| Align Tool | Aligns selected objects such as rectangle, circle, line, spline, arc, pline, block and even 3D model object along X or Y axis coordinates. |
| Arrange Tool | Adjusts the arrangement of multiple objects. It can align multiple objects at left, right, top, bottom and center and also can arrange vertically or laterally. |
| MEASUREGEOM | Supports measuring distance, radius, angle, area, volume sum area and so on. |
| Symmetric Draw | Generates the symmetrical object automatically when drawing an object. |
| Outline Objects | Extracts the outline shape of selected closed objects in a window selection method. |
| Invert Fillet | The FILLET command now offers a new option called Invert. You can create a reverse fillet with this option. |
| Magnifier | Views a specific area of your drawing as a magnifier with the capability of snap points without performing zoom in/out. |
| Barcode & QR Code | Creates Barcode & QR Code by entering data or picking data from drawings. |
| Shortcut Customization(CUSTACC) | The CUSTACC command allows you to customize, delete or modify existing command shortcuts. |
| Table Tools | A set of practical tools to draw and edit tables and can export CAD tables to Excel files. |
| AutoXLSTable | Opens Excel file to edit the data and insert it into GstarCAD. It also allows updating the table data after the drawing was modified. |
| Pline Boolean | Supports different Boolean operation options such as union, intersection and subtraction. |
| Batch Print | Batch print drawings with the same drawing frame attribute in a drawing. |
| Arrange Frame | Inserts frames of drawings, calculates according to the size of the frame and then arranges them to a big drawing. |
| GstarCAD Collaboration | Helps to improve project design efficiency and significantly reduce error and cost. |
| … | … |
What's New in GstarCAD 2025
Parametric Constraints New
GstarCAD 2025 introduces Parametric Constraints, focusing exclusively on geometric constraints this year. Geometric constraints manage how objects relate to others, enabling automatic adjustments to other objects when changes are made. They also restrict changes to distance and angle values, ensuring design precision.
There are 12 types of geometric constraints corresponding to 12 relationships: Coincident, Collinear, Concentric, Fix, Parallel, Perpendicular, Horizontal, Vertical, Tangent, Smooth, Symmetric, and Equal.
This feature is only available in the GstarCAD 2025 Plus version.

(1)Coincident: Constrains two points to coincide, or a point to lie anywhere on an object or the extension of an object.
- Access: Click Ribbon

Parametric
Geometric

or enter GCCOINCIDENT command.
-
Command Prompts:
-
Select the first point or [Object]: Select the first point or object that needs to coincide.
-
Select the second point or [Object]: Select the second point or object that coincides with the first point or object.
-
-
Example:

(2)Collinear: Constrains two lines to lie on the same infinite line.
- Access: Click Ribbon
Parametric
Geometric

or enter GCCOLLINEAR command.
-
Command Prompts:
-
Select the first object or [Multiple]: Select the first object orc multiple objects that need to be collinear;
-
Select the second object or [Multiple]: Select one or multiple objects that are collinear with the first object or the group of objects.
-
-
Example:

(3)Concentric: Constrains selected circle, arcs, or eclipses to maintain the same center point.
- Access: Click Ribbon
Parametric
Geometric

or enter GCCONCENTRIC command.
-
Command Prompts:
-
Select the first object: Select the first object that needs to be concentric;
-
Select the second object: Select the second object that is concentric with the first object.
-
-
Example:

(4)Fix: Constrains a point or a curve to a fixed location and orientation relative to the World Coordinate System.
- Access: Click Ribbon
Parametric
Geometric

or enter GCFIX command.
-
Command Prompt:
- Select point or [object]: Select the point or object that needs to be fixed;
-
Example:

(5)Parallel: Constrains two lines to maintain the same angle.
- Access: Click Ribbon
Parametric
Geometric

or enter GCPARALLEL command.
-
Command Prompts:
-
Select the first object: Select the first object that needs to be parallel;
-
Select the second object: Select the second object that is parallel with the first object.
-
-
Example:

(6)Perpendicular: Constrains two lines, or polyline segments to maintain a 90-degree angle to each other
- Access: Click Ribbon
Parametric
Geometric

or enter GCPERPENDICULAR command.
-
Command Prompts:
-
Select the first object: Select the first object that needs to be perpendicular;
-
Select the second object: Select the second object that is perpendicular with the first object.
-
-
Example:

(7)Horizontal: Constrains a line or pairs of points to lie parallel to the X-axis of the current UCS.
- Access: Click Ribbon
Parametric
Geometric

or enter GCHORIZONTAL command.
-
Command Prompts:
- Select an object or [2Points]: Select the object or two points that needs to be parallel to the X-axis.
-
Example:

(8)Vertical: Constrains lines or pairs of the points to lie parallel to the Y-axis of the current UCS.
- Access: Click Ribbon
Parametric
Geometric

or enter GCVERTICAL command.
-
Command Prompts:
- Select an object or [2Points]: Select the object or two points that needs to be parallel to the Y-axis.
-
Example:

(9)Tangent: Constrains two curves to maintain a point of tangency to each other or their extensions.
- Access: Click Ribbon
Parametric
Geometric

or enter GCTANGENT command.
-
Command Prompts:
-
Select the first object: Select the first object that needs to be tangent;
-
Select the second object: Select the second object that is tangent with the first object.
-
-
Example:

(10)Smooth: Constrains a spline to be contiguous and maintain G2 continuity with another spline, line, arc, or polyline.
- Access: Click Ribbon
Parametric
Geometric

or enter GCSMOOTH command.
-
Command Prompts:
-
Select the first spline curve: Select the first object that needs to be smoothed;
-
Select the second object: Select the second object that satisfies G2 continuity with the first object.
-
-
Example:

(11)Symmetric: Constrains two curves or points on objects to maintain symmetry about a selected line.
- Access: Click Ribbon
Parametric
Geometric

or enter GCSYMMETRIC command.
-
Command Prompts:
-
Select the first object or [2Points]: Select the first object that needs to be parallel;
-
Select the second object or [2Points]: Select the second object that is parallel with the first object.
-
Select symmetry line: Select the axis of symmetry.
-
-
Example:

(12)Equal: Constrains two lines or polyline segments to maintain equal lengths, or arcs and circles to maintain equal radius values
- Access: Click Ribbon
Parametric
Geometric

or enter GCEQUAL command.
-
Command Prompts:
-
Select the first object or [Multiple]: Select the first object(s) that need(s) to be equal;
-
Select the second object or [Multiple]: Select the object(s) equal to the first object.
-
-
Example:


Show/Hide (CONSTRAINTBAR): Select objects to display or hide their associated geometric constraints.

Show All: Display all geometric constraints.

Hide All: Hide all geometric constraints.

Delete Constraints (DELCONSTRAINT): Delete all constraints that are associated with the selected objects.

Constraint Settings (CONSTRAINTSETTINGS): Manage settings related to constraints


Note: You can also use GEOMCONSTRAINT command to establish or maintain geometric relationships between objects or points on objects.
The order and selection points of objects can influence their relative positions when applying a geometric constraint to a pair of objects.
Each option of this command corresponds to an individual command from (1) to (12).
Parametric Constraint Related System Variables
| System Variable | Description | Value | Value Description |
|---|---|---|---|
| CONSTRAINTBARDISPLAY | Controls the display of constraints bars for subsequently applied geometric constraints, as well as the display of hidden constraints for selected objects. | 0 | Automatically hides constraint bars after applying geometric constraints. |
| 1 | Displays constraint bars when objects are geometrically constrained. | ||
| 2 | Displays any hidden constraints, but only if the constrained objects are selected. | ||
| CONSTRAINTBARMODE | Controls the display of geometric constraints on constraint bars. Setting it as 4095 could display constraint bars for all constraint types | 1 | Horizontal |
| 2 | Vertical | ||
| 4 | Perpendicular | ||
| 8 | Parallel | ||
| 16 | Tangent | ||
| 32 | Smooth | ||
| 64 | Coincident | ||
| 128 | Concentric | ||
| 256 | Collinear | ||
| 512 | Symmetric | ||
| 1024 | Equal | ||
| 2048 | Fix | ||
| CONSTRAINTINFER | Controls whether the geometric constraints are inferred while creating and editing geometry. | 0 | Off |
| 1 | Geometric constraints are inferred | ||
| CONSTRAINTNAMEFORMAT | Controls the text format for dimensional constraints. | 0 | Name (for example, Width) |
| 1 | Value (for example, 4.0000) | ||
| 2 | Expression (for example, width = 4.0000) | ||
| CONSTRAINTSOLVEMODE | Controls constraint behavior when applying or editing constraints. | 0 | Does not maintain the geometry’s size when a constraint is applied or edited |
| 1 | Maintain of the geometry’s size when a constraint is applied or edited | ||
| CBARTRANSPARENCY | Controls the transparency of the constraint bars. | 50 | The valid value ranges from 10 to 90. Higher value makes the constraint bars more opaque. |
Hardware Acceleration New

In our daily use, we often need to process and compute image data. However, the CPU, with its numerous tasks, cannot meet our speed requirements for image processing and calculations sometimes. Therefore, in GstarCAD 2025, we have introduced Hardware Acceleration. This feature leverages the GPU, which excels at handling images, to assist the CPU, thereby enhancing graphic display quality and work efficiency, and improving overall performance. Enabling hardware acceleration provides more efficient, high-quality real-time display effects compared to the CPU, and offers better highlight effects.

Hardware Acceleration can automatically determine whether to activate based on the user's hardware configuration. It can also be manually controlled using the command GRAPHICSCONFIG, or by clicking the Performance Settings icon in the status bar.

- Hardware Configuration:
Displays the current user's hardware environment, including the Graphics Card, Driver Version, and OpenGL version information.
- Graphics Display Settings:
Hardware Acceleration: Enable to activate Hardware Acceleration, using GPU for optimized graphics rendering. If disabled, the mode switches to the default "Software Mode”.
Smooth Line Display: Removes jagged edges from the graphic for a smoother display.
| System Variable | Description | Value | Value Description |
|---|---|---|---|
| HARDWAREACCELERATE | Indicates whether Hardware Acceleration is enabled or disabled. (Read-only) | 0 | Disabled |
| 1 | Enabled |
If hardware acceleration cannot be enabled, it may be due to the hardware environment not meeting the requirements:
-
OpenGL version below 4.2 or outdated driver version. You can try upgrading the system's graphics driver.
-
If you encounter compatibility or performance issues, you can try disabling hardware acceleration.
-
To ensure the best software experience, Windows 7 and earlier versions of the operating system are not supported.
If your system has dual graphics cards (dedicated and integrated), it is recommended to manually set the high-performance graphics card to achieve better display performance. The method to set the high-performance graphics card depends on the graphics card model and its corresponding software and driver version. Taking Windows 11 as an example, the manual setting method is as follows:
-
Right-click on the desktop and select "Display settings".
-
In "Display settings", find "Graphics".
-
On the "Graphics" page, under "Custom options for apps", click "Browse", find gcad.exe in the installation path, and add it to the list.
-
Click on the GstarCAD application in the list and then click "Options".
-
In the Graphics preference dialog box, select "High performance" and click save.
Compared to the previous version, GstarCAD 2025 shows improved display effects in the following areas:
Highlight Display
Hardware Acceleration provides clearer highlighting effects, marking selected objects more distinctly. This allows users to identify, select, and operate more accurately, enhancing the user experience.

| System Variable | Description | Value | Value Description |
|---|---|---|---|
| SELECTIONEFFECT | Controls the highlight display mode of selected objects when Hardware Acceleration enabled | 0 | Dashed lines |
| 1 | Blue glowing line highlighting effect | ||
| SELECTIONEFFECTCOLOR | Sets the color of the glowing highlighting effect when objects are selected Note: Only applies when SELECTIONEFFECT is set to 1. | 0 | Valid values are from 0 to 255 |


Basic Visual Styles Support
Added support for two visual styles: Conceptual and X-ray:
-
Conceptual Visual Style: Typically used in the early design stages, this style makes the graphics appear simpler.
-
X-ray Visual Style: Allows for a clearer view of the relationships between objects.
These visual styles control the display of drawings, making objects clearer and improving drawing efficiency.


Conceptual X-ray
Lighting Improvements
We have also optimized lighting, making the effects softer and allowing adjustments based on real-time preview. Key improvements include:
-
Point Light: Provides uniform illumination in all directions, suitable for simulating indoor lighting or general ambient lighting.
-
Spotlight: Concentrates light in a small area, ideal for highlighting specific objects or emphasizing focal points.
-
Web Light: Displays the range or area formed by the light, simulating the radiation range of light.
-
Target Point Light: Specifies a point as the light source, commonly used to simulate a light bulb or flame.
-
Free Web: Illuminates the surrounding environment without being blocked by surrounding objects.


Hardware Acceleration OFF Hardware Acceleration ON
3D Mouse Device Adaption New

3Dconnexion is an international manufacturer of 3D mouse devices. GstarCAD 2025 version supports 3Dconnexion's SpaceMouse and CadMouse. Including using the controller's joystick to switch views, executing commands and switching views quickly via mouse shortcuts, and customizing mouse buttons configurations within the driver software.
Knob and Joystick: The 3D mouse allows for combined operations of pushing and pulling with the central knob joystick, enabling zooming and panning in 2D views and perspective adjustments in 3D views.
Shortcut Buttons: Configurable shortcut buttons on the 3D mouse facilitate certain CAD and Windows functions.
| System Variable | Description | Value | Value Description |
|---|---|---|---|
| CURSORTYPE | Controls whether the mouse cursor is in the GCAD drawing crosshair style. (The value of this system variable is not stored in the registry and will be reset after restarting the CAD software.) | 0 | The mouse cursor will follow the original GCAD logic and change to the crosshair style when positioned in the drawing area. |
| 1 | The mouse cursor will remain as the Windows system arrow style when positioned in the drawing area, and will not change according to the default GCAD style. |
Voice Annotation New
You can enter VOICEMANAGER or click Menu Bar
Tools
VoiceManager to add voice annotations in GstarCAD 2025, enhancing clarity. Through the Voice Manager panel, you can easily create, record, play, and manage voice annotations.

Create Voice Annotation
Click the "New" button to create a voice annotation on the drawing.
Command prompt: Specify insertion point or [Object (O)/Range (R)/Speaker (S)]:
-
Point: Specify an absolute point location to generate a voice annotation.
-
Object: Select an object to bind the voice annotation to it. Only one object can be bound at a time, suitable for annotating a single object with voice.
-
Region: Select a region to bind the voice annotation. Only one region can be bound at a time, suitable for annotating multiple objects with voice.
-
Speaker: Edit the name of the speaker for this voice annotation.
Record
There are three modes when recording: Standby, Error, and Working.
- Recording Mode - Standby
After creating a voice annotation, the voice annotation panel is activated. At this point, the color of the record button changes from gray to red. Click this button to start recording.

- Recording Mode - Error
When the user's microphone device encounters an error or permissions are disabled, the record button will turn into a cautionary yellow color. On the right side of the button, there will be a "Retry Detection" option. In this scenario, the recording cannot proceed. Users need to manually check if there are any issues with the microphone and ensure that microphone permissions are correctly enabled to restore recording functionality.
"Retry Detection": Click this button to recheck your recording environment. Once the user successfully troubleshoots the issue, the system will automatically switch to working mode, ready to start recording at any time.

- Recording Mode - Working
"Reset Voice": Allows for retaking the current voice annotation.
"Delete Voice": Deletes the recorded voice and its associated objects.

Play
- Play Mode - Standby

- Play Mode – Play

Manage

-
Hide All: By default, all voice objects on the drawing are visible. Users can manually choose to hide all voice objects. Note that even if all voice objects are hidden before closing the drawing, the system will automatically restore all voice objects to their default visible state when reopening the drawing. Any hiding actions performed before closing the drawing will not be retained.
-
Lists: Displays a pop-up voice annotation list for viewing and management. Supports filter, delete, position and retake.

-
1 - Filter: Supports filtering by point, region and object types. Users can customize the voice annotations displayed in the list.
-
2 - Delete: Deletes the selected voice annotation.
-
3 - Position: Zooms the drawing area to the selected voice annotation's region.
-
4 - Retake: Allows for re-recording the selected voice annotation.
-
Settings: Opens the "Voice Annotation Settings" dialog box, as shown in the image.

Others
To implement the Voice Annotation feature, we utilize the WebView2 control provided by Microsoft. This control is designed to seamlessly embed web content into native applications, enhancing functionality and user experience.
There are some compatibility differences between different versions of the WebView2 control across various operating systems. Therefore, we provide different solutions tailored to users' operating systems:
-
Windows 10 and Windows 11: The system comes pre-installed with WebvView2. If your device lacks this control, the software will automatically initiate the Microsoft installer when it gets online to quickly complete the installation.
-
Windows 7 and Windows 8 (Online): Since the latest version of the Webview2 control does not support these two system versions, the software will launch the Microsoft installer when the user's device is online and attempts to use the voice annotation feature in GstarCAD 2025. This process ensures that users receive necessary support even on older operating systems.
-
Windows 7 and Windows 8 (Offline): Without an internet connection, the software cannot launch the Microsoft installer to obtain the Webview2 installation package, temporarily disabling the voice annotation feature. We recommend users connect to the internet to obtain the necessary installation files.
BIM Data Editing New
BIM data can now be edited directly in GstarCAD 2025, providing enhanced efficiency for your design workflow!
Currently Supported BIM Properties for Editing:
| Property Set | Example | Property Name | Support |
|---|---|---|---|
| BIM | 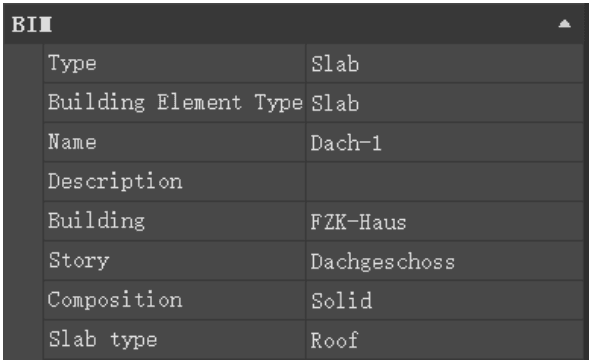 | Type |  |
| Building Element Type | | ||
| Name |  | ||
| Description | | ||
| Building | | ||
| Story | | ||
| Composition | | ||
| Overall Height | | ||
| Overall Width | | ||
| Predefined Type | | ||
| Operation Type | | ||
| Common BIM Properties | 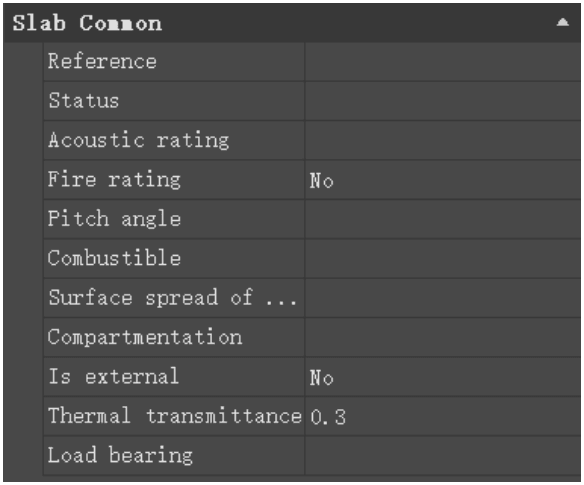 | / | |
| Other Inherent BIM Properties | 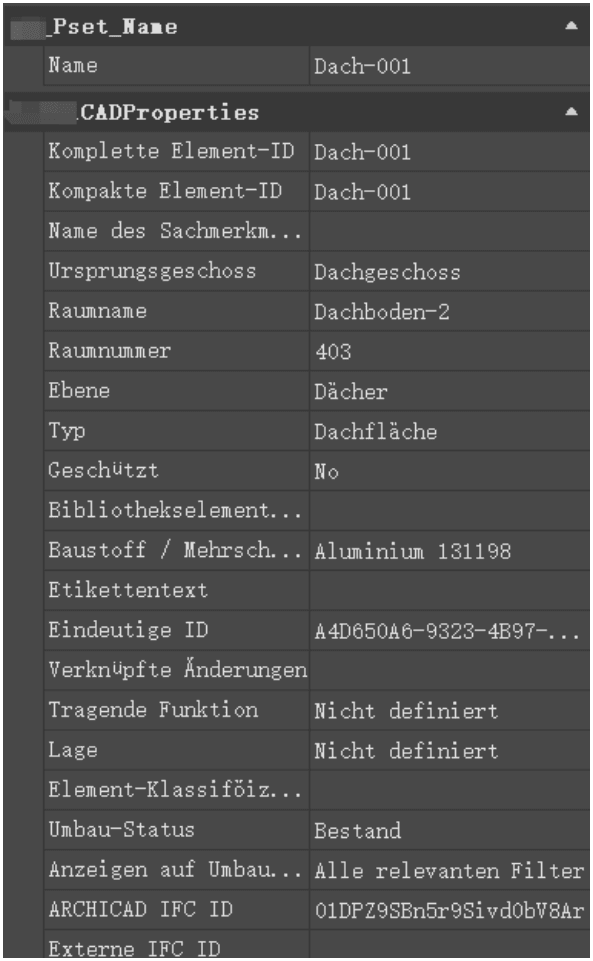 | / | |
| Custom Property Sets | / | |
Adding and deleting custom properties and custom property sets currently are not supported in GstarCAD.
Break at Point New

You can enter BREAKATPOINT command to break the selected object into two objects at a specified point.
If the specified point is off the object, it will be automatically projected onto it.
This applies to lines, arcs, and open polylines. Closed objects, like circles, cannot be broken at a single point.
To break an object and create a gap, use the BREAK command and specify the gap with two points.
DWGUNITS New
Different projects or application scenarios may require different units. For example, architectural design might use meters, while mechanical design might use inches. In GstarCAD 2025, the newly added DWGUNITS command allows you to change the units of drawings to meet the standard size and annotation requirements of the drawing and avoid errors due to using different units.
You can enter DWGUNITS command or click Ribbon
Express
Modify

DWG Units.
Command Line Prompts:
- (1) Enter units for length <3>: The default unit for imperial drawings is "3. Millimeters" and for metric drawings is "1. Inches". Six common units are available.

- (2) Enter linear display format<4>:

- (3) Enter linear display precision<4>:

- (4)

Controls whether objects inserted into the current drawing will be scaled according to existing objects. If set to "Yes," inserted objects may be scaled to better match the current drawing environment.
- (5)

Ensure that the dimensions of objects match the scale of the drawing. If set to "Yes," inserted objects will be measured and displayed using the same units as the current drawing.
- (6)

Controls whether the dimensions and scale of objects in the current drawing are adjusted to reflect the unit modification.
- (7)

Controls whether objects are included in pper space.
For example, when converting a drawing from imperial (inches) to metric (millimeters) units:

After executing the DWGUNITS command, the unit of the object is modified:

Different options may lead to different prompts. Just follow the prompts on the command line for accurate instructions.
Application Manager New

You can enter APPMANAGER command or click Ribbon
Application
Application Manager to open Application Manager. It is a unified system for plugin management. Users can search, enable/disable, and view details of modular applications within the Application Manager, achieving the most suitable service configuration with minimal resource utilization.

API Innovative

GstarCAD continuously enhance the integrity and compatibility of GRX, .NET, and LSP, ensuring that users' secondary development programs run smoothly after migration, thereby reducing the cost of secondary development migration.
In GstarCAD 2025, we support the use of Python on Windows to extend the capabilities of the GstarCAD platform. With over 790 commonly used Python interfaces, we cover daily usage scenarios, such as creating custom commands, custom graphics and entities, accessing and modifying various drawing data, and implementing custom drawing and analysis algorithms. Users can leverage Python's powerful features for custom development and automation, significantly expanding GRX functionality. This script-based invocation of GRX interfaces supports cross-platform development and lowers the learning cost for new developers.
System Environment Requirements
-
Python 3.11.8
-
Windows 10 and above
Install Python
Download the installation package and install it as administrator, configure the options as below:


Then finish the installation.
Import Interface
Use the Import command in the Python file to import the secondary development package:
from pygcad.core import *
from pygcad.pygrx import *
pygcad.core includes Python-specific core interfaces such as the @command decorator;
pygcad.pygrx contains various types and methods corresponding to GRX interfaces.
Register Custom CAD Commands
During development, when a user-defined function is decorated with @command, this function is automatically registered as a command in GstarCAD, with the function name as the default command name. For example:

The function pyDrawLine() is decorated with @command(), automatically registering it as the GCAD command PYDRAWLINE.
If you don't want to use the function name as the command name, you can specify it in the decorator function command(). The @command decorator is defined as follows:
def command(local_name="", global_name="", group_name="", cmd_flags=0):
When local_name is empty, the name of the decorated function is automatically used as local_name. If global_name is empty, it automatically uses local_name as global_name. If group_name is empty, it selects global_name as group_name. For example:

This defines a custom command: PY_MY_CMD.
Load in GstarCAD
For example, we used the secondary development interface to develop our own PYMKENTS command. Python file is: ents.py. After running the command, the program will draw a line, a circle with a red linetype, and create a layer named ASDK_MYLAYER.
- Open GstarCAD 2025, enter the APPLOAD command, the Load/Unload Applications dialog box will pop up:

- Click Load button and select the ents.py file, it will register the command automatically: PYMKENTS

- Close the dialog box and enter command PYMKENTS, the program automatically runs:

DIM Improvement
To enhance drawing efficiency, we have optimized the DIM command for dimensioning. Now, you can enter DIM or click Ribbon
Annotation

Dimension to create multiple types of dimensions, including Linear, Ordinate, Angular, Diameter, Arc Length, Radius and Jogged Radius dimensions.
When you hover the cursor over an object, the DIM command will automatically generate a preview of the appropriate dimension type. Simply select the object or a point on the object, and click to place the dimension line to complete the dimensioning. This allows you to create various types of dimensions with a single command, eliminating the need to frequently switch between different dimension commands, thereby simplifying the workflow and speeding up the drawing process.
Command Line Prompt:
Select objects or specify first extension line origin or [Angular/Baseline/Continue/Ordinate/aliGn/Distribute/Layer/Undo]:
- Select Objects: Defaults to the appropriate dimension type for the selected objects and displays the corresponding prompts for that dimension type.
| Object Type | Default Dimension Type |
|---|---|
| Line | Linear dimensions |
| Circle | Diameter dimensions |
| Arc | Radius dimensions |
| Polyline | Linear or radius dimensions, depending on the segment selected |
-
First Extension Line Origin: Specify two points to create a linear dimension.
-
Angular: Creates an Angular Dimension displaying the angle between three points or two lines (similar to the DIMANGULAR command).
-
Vertex: Specifies the point to use as the vertex of an angular dimension.
-
Specify first side of angle: Specifies one of the lines defining the angle.
-
Specify second side of angle: Specifies the other line defining the angle.
-
Specify angular dimension location: Specifies the quadrant and location for the arc dimension line.
-
Mtext: Edits the dimension text with the Text Editor contextual tab.
-
Text: Edits the dimension text in the Command window.
-
text aNgle: Specifies the angle of the dimension text.
-
Undo: Returns to the previous prompt.
-
-
-
Undo: Returns to the previous prompt.
-
Baseline: Creates a Linear, Angular, or Ordinate Dimension based on the first extension line of the previous or selected dimension (similar to the DIMBASELINE command).
-
Specify first extension line origin: Specifies the first extension line of the base dimension as the extension line origin for the baseline dimension.
-
Specify second extension line origin: Specifies the next edge or angle to dimension.
-
Select: Prompts you to select a linear, ordinate, or angular dimension to use as the base for the baseline dimension.
-
Offset: Specifies the offset distance from which the baseline dimensions are created.
-
Undo: Undoes the last baseline dimension created.
-
-
Continue: Creates a Linear, Angular, or Ordinate Dimension from the second extension line of a selected dimension (similar to the DIMCONTINUE command).
-
Specify first extension line origin: Specifies the first extension line of the base dimension as the extension line origin for the continued dimension.
-
Specify second extension line origin: Specifies the next edge or angle to dimension.
-
Select: Prompts you to select a linear, ordinate, or angular dimension to use as the base for the continued dimension.
-
Undo: Undoes the last baseline dimension created.
-
-
Ordinate: Creates an Ordinate Dimension (Similar to DIMORDINATE command).
-
Specify feature location: Prompts for a point on a feature such as an endpoint, intersection, or center of an object.
-
Specify leader endpoint: Uses the difference between the feature location and the leader endpoint to determine whether it is an X or a Y ordinate dimension. If the difference in the Y ordinate is greater, the dimension measures the X ordinate. Otherwise, it measures the Y ordinate.
-
Xdatum: Measures the X ordinate and determines the orientation of the leader line and dimension text.
-
Ydatum: Measures the Y ordinate and determines the orientation of the leader line and dimension text.
-
Mtext: Displays the Text Editor contextual tab to edit the dimension text.
-
Text: Edits the dimension text at the Command prompt.
-
Angle: Specifies the angle of the dimension text.
-
Undo: Returns to the previous prompt.
-
-
-
Undo: Returns to the previous prompt.
-
Align: Aligns Multiple Parallel, Concentric, or Same Datum Dimensions to a selected base dimension.
-
Select base dimension: Specifies a dimension to use as the basis for the dimensions alignment.
- Select dimensions to align: Selects the dimensions to align to the selected base dimension.
-
-
Distribute: Specifies the method to distribute selected isolated linear or ordinate dimensions:
-
Equal: Equally distributes all selected dimensions (requires a minimum of three dimension lines).
-
Offset: Distributes all selected dimensions at a specified offset distance.
-
-
Layer: Assigns new dimensions to a specified layer, overriding the current layer.
-
Enter layer name: Specifies the layer by entering its name
-
Enter “ . ”: Uses the current layer
-
Object: Specifies the layer by selecting an object of it
-
Enter “ ? ”: Lists all the layers in the current drawing
-
eXit: Returns to the previous prompt
-
-
Undo: Reverses the Last Dimension Operation.
-
Handling Overlapping Dimensions:
-
Move Away: Arranges the existing dimension and the newly inserted dimension into a baseline dimension type.
-
Break Up: Splits the existing dimension into two dimensions, arranging them into a continued dimension type.
-
Replace: Deletes the existing dimension and replaces it with the new one.
-
None: Inserts the new dimension on top of the existing one.
-
If Intelligent DIM is disabled in the Application Manager, executing the DIM command will switch to the normal DIM mode. For more details, please refer to the DIM1 command.
3D Model Import/Export Improvement
On the basis of IFC Import, you can now export IFC files and import RVT files with complete BIM data, and STEP/IGES module will be included in GstarCAD installer, you don't need to install it separately.
IFCEXPORT
On the basis of IFCIMPORT, now you can enter IFCEXPORT command or go to Ribbon
BIM

Export IFC files to export drawings in IFC format with their complete BIM data.

Besides, there’s also a newly added system variable for handling IFC files in GstarCAD:
| System Variable | Description | Value | Value Description |
|---|---|---|---|
| SHOWALLIFCENTITIES | Controls the display and hiding of entities in IFC files that are not associated with building entities. | 0 | Hides entities in the IFC drawing that are not associated with building entities. |
| 1 | Displays entities in the IFC drawing that are not associated with building entities. |
RVTIMPORT
You can enter RVTIMPORT command or go to Ribbon
BIM

Open RVT files to import drawings in RVT format with their complete BIM data.

IGES/STEP Module
IGES/STEP will be included in the GstarCAD installer, there’s no need to install it separately, and you can manage it along with other modules in the Application Manager.
File & Layout Tab Bar Improvement
The File Tab Bar and Layout Tab Bar in GstarCAD 2025 have been updated with new appearances.
File Tab Bar

In GstarCAD 2025, the File Tab Bar has been enhanced with "New" and "List" buttons, making it more convenient to create, open, and switch between drawings directly from the file tab bar.
Additionally, new icons has been added next to the file name to indicate when a file is locked or has been modified, providing a clearer display of the file status. The new appearance and display method also take up less space.
- The drop-down list allows you to switch drawings, create new ones, open, save, and close drawings.


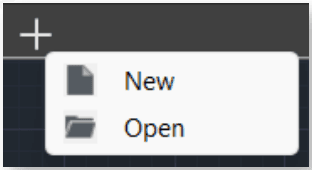
Clicking the "New" button allows you to directly create a new document, and the right-click menu provides options for creating and opening drawings.
Layout Tab Bar
The new Layout Tab Bar is similar with the File Tab Bar, they both include a "List" button.

Other than being positioned above the status bar, now or the Layout Tab Bar could also be aligned with it to save screen space.


Lasso Selection Improvement
The Lasso selection allows you to create an irregularly shaped window or crossing selection set. The implementation of lasso selection can not only replace frame selection to select simple objects, but also solve the problem of difficult selection of some complex objects using frame selection.
How to Use Lasso Selection
To use the lasso selection, just hold the mouse button down while dragging the mouse to create the lasso. When you release the mouse button, the lasso is completed.
Lasso Selection Modes
Lasso selection provides three modes: Window Lasso, Crossing lasso and Fence lasso, you can press the spacebar to cycle through the lasso modes.
- Window Lasso Selection: Hold the mouse button down and drag the mouse from left to right, only the objects that are completely enclosed in the selection area are selected.


- Crossing lasso selection: Hold the mouse button down and drag the mouse from right to left, the objects enclosed in and that are crossed by the selection area are selected.


- Fence Lasso Selection: Specify points to define a fence, the objects that pass through the fence will be selected.


System Variable Compatibility
GstarCAD optimizes the PICKAUTO system variable to be consistent with ACAD.
| System Variable | Description | Value | Value Description |
|---|---|---|---|
| PICKAUTO | Used in conjunction with lasso selection to control the automatic windowing for object selection. This system variable is also used to control the opening and closing of the lasso. | -7 ~ -1 | Selects an object by clicking. It only stores the value and the value will not take effect. |
| 0 | Selects an object by clicking. Turns off automatic window and crossing selection. | ||
| 1 | Starts a window or crossing selection if the cursor is not directly over an object when clicking; Selects an object directly by clicking if the cursor is on the object, selection complete. | ||
| 2 | Starts a window or crossing selection even if the cursor is directly over an object. | ||
| 4 | Starts a window or crossing lasso selection if the cursor is not directly over an object when clicking; Selects an object directly by clicking and dragging if the cursor is on the object, selection complete. |
To specify more than one option, enter the sum of their values. For example, entering 5 specifies the bitcode 1 and 4 options.
| Value | Description |
|---|---|
| 3 | The combination of bitcode 1 and bitcode 2 which has the same effect as bitcode 2 |
| 5 | The combination of bitcode 1 and bitcode 4 which has the same effect as bitcode 4 |
| 6 | The combination of bitcode 2 and bitcode 4 |
| 7 | The combination of bitcode 1, 2 and 3 which has the same effect as bitcode 6 |
Summary:
-
When the value of PICKAUTO is 0, the objects can be selected only by clicking.
-
When the value is 1, 2 or 3, it’s window selection.
-
When the value is 4, 5, 6 or 7, it’s the window selection and crossing lasso selection (To specify a window selection area, click and release the left mouse button, move the cursor, and click again to finish; To create a lasso selection, click, drag, then release the left mouse button to finish).
Window Selection Improvements

You can directly specify the diagonal point when making a frame selection. The options of fence selection (F), window polygon selection (WP), and crossing polygon selection (CP) have been added. You can switch to fence selection or polygon selection mode by entering the keywords.
Selection Cycling
GstarCAD 2025 supports Selection Cycling during command execution, allowing users to filter and select the desired objects from overlapping entities.

UNDO Improvement
In GstarCAD 2025, the UNDO command supports the combination of zooming and panning operations as well as layer operations. After combination, multiple zooming, panning and layer operations can be undone at once, eliminating the need for repeated operations.
-
There are two ways to pan: input the command PAN or press down the middle mouse button and drag to pan (IntelliPan)
-
Similarly, there are two ways to zoom: input the command ZOOM or scroll the middle mouse button. (IntelliZoom)
The combined results are detailed in the table below (completely consistent with ACAD):
| Scenario | Combined Result (View in the UNDO operation record on the quick access tool bar) |
|---|---|
| PAN multiple times in a row | Pan |
| IntelliPan multiple times in a row | Pan |
| ZOOM multiple times in a row | Zoom |
| IntelliZoom multiple times in a row | Zoom |
| Consecutive PAN + IntelliPan | Pan |
| Consecutive ZOOM + IntelliZoom | Zoom |
| Consecutive PAN + IntelliZoom/ ZOOM+ IntelliPan | Pan and Zoom |
| Consecutive PAN + ZOOM | Pan and Zoom |
| Consecutive IntelliPan + IntelliZoom | Pan and Zoom |
- After performing layer-related operations in the Layer Properties Manager (such as create a new layer, switch layers, freeze layers, lock layers, etc.), the UNDO operation record on the quick access toolbar will be combined as "Layer".
The setting is stored as a bitcode using the sum of the following bitcode values:
| System Variable | Description | Value | Value Description |
|---|---|---|---|
| UNDOCTL | Displays the options used in the UNDO command. (read-only variable) | 0 | UNDO is turned off |
| 1 | UNDO is turned on | ||
| 2 | Only one command can be undone | ||
| 4 | Auto is turned on | ||
| 8 | A group is currently active | ||
| 16 | Zoom and pan operations are grouped as a single action | ||
| 32 | Layer property operations are grouped as a single action |
- Support Changing Related Options in OPTIONS Dialog Box

Batch Plot Improvement
Batch Plot in GstarCAD 2025 has been comprehensively improved based on user feedback, making it applicable to more scenarios.

The main enhancements are as follows:
-
Specify batch setup
- Filter Base: In addition to blocks, layers, and polylines, it now supports external reference (only displays this option when there is Xref in the current drawing).

-
Specify frame: In the old versions, "Specify frame" only supported a single selection, now there are some enhancements:
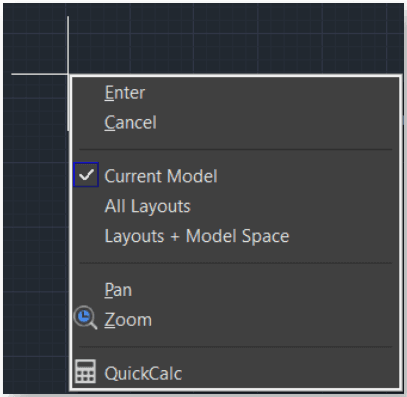
After clicking "Specify frame", multiple selections are now supported.
-
Traverse option is provided. When the selection prompt appears, right-click to choose to traverse the model, layout, or both, as shown in the picture. After selecting the corresponding option, it will directly traverse all objects in the model and/or layout space, filtering the drawing frames that meet the conditions.
- Exclusion Setting: When filtering, some graphics might be mistakenly identified as frames. This can be preliminarily screened through a ratio. If the area of certain filtered frames is smaller than a certain percentage of the maximum fram, they will be removed from the filtering results.

- Plot Setup & Options
The Plot Setup and Options are basically the same as those in the regular plot dialog box, but they have been filtered and rearranged. Adjustments have been made based on user needs. If the current model or layout has a default page setup, the settings of the current space plot configuration will be directly read. If there is no page setup, all settings can be completed in this dialog box.

-
Plotter Name: It will directly read the default plotter from the "Options" dialog box. This eliminates the need for additional configuration. If users frequently use the same printing device, they can simply set the default output device in the "Plot and Publish" tab of the Options dialog box.
-
Plot to File: When selecting PDF, DWF, or other printing devices, "Plot to File" is automatically checked. When selecting a physical printer, it is not checked, but users can choose to check it. If checked, it will plot and output to PLT.
-
Multi-sheet file: This option is activated only when the PDF plot driver is selected. During plotting, a multi-sheet PDF file will be automatically generated instead of separate PDF files.
-
Number of Copies: When users need to use a physical plotter, they can set the number of copies, with the same functionality as the regular plot dialog box.
-
Drawing Orientation: The default is the "Automatic Rotate" option from the old versions. Horizontal and vertical options have been added. If horizontal or vertical is selected, the graphic will be forcibly oriented accordingly.
-
Plot Options: Shade Plot, Plot Linewidths, Plot with transparency, Plot Stamp are the same as those from the regular plot dialog box.
-
File Setup
If user selects drivers like PDF and DWF, or selects a physical plotter device and then checks "Plot to File”, file options can be set.

-
Prefix Name: The current drawing's filename is read as the default prefix, and users can edit it according to their needs.
-
Starting Number: Users can set a starting number, facilitating batch plotting.
-
Digit: Determine the number of digits for the numbering. For example, if 2 digits are specified, the numbers will be 01, 02, …, 10, 11. If 3 digits are specified, the numbers will be 001, 002, …, 010, 011.
-
Save Path: The source file path is displayed by default, and users can edit or add subdirectories.
-
Source file path drop down list: Provides three options: Source file path, Source file path\PDF, Options default saving path.

- Processing Options

-
Plot Order: Nine sorting methods are provided.
-
Eight of these are based on different directions: top left to bottom right, bottom left to top right, top left to bottom right, top right to bottom left, top right to bottom left, bottom right to top left, bottom left to top right, and bottom right to top left.
-
Another method is to sort according to the selection order (suitable for multiple selections). By default, the first button (top left to bottom right) is selected. The background of the selected button changes to red.
-
-
Check and Adjust: Clicking the Check and Adjust button will bring up a dialog box displaying the Serial Number, Drawing Size, Plot Scale, and Paper Size information of the filtered frames:

-
When the dialog box pops up, the filtered frames will be highlighted in the drawing, and the numbers will also be displayed, which correspond to those in the dialog box. Users can determine whether the filtered drawings are correct by checking their sizes or by clicking Preview. If some of the filtering results are incorrect, users can click Delete, and the remaining items will be automatically renumbered.
-
Additionally, users can adjust the Plot Scale, Paper Size, and Drawing Orientation here, meeting the need for plotting drawings of different sizes in one batch.
-
Output Options: Four options are provided: Plot to Layout, Split into DWG, Split into DXF, and Plot.
-
Print to Layout: Previously in the dropdown list, is now listed separately.
-
Split into DWG: A new option that allows the filtered frames and content to be saved as separate DWG files.
-
Split into DXF: Another new option that allows the filtered frames and content to be saved as separate DXF files.
-
Plot: Equivalent to the "OK" button in the old dialog box and is the default option.
-
-
QR Code Improvement
The QRCODE command now supports command line mode -QRCODE, facilitating the creation of QR codes via scripts or programs.


PASTESPEC Improvement
After copying data from an Excel worksheet to the Windows clipboard, you can enter the PASTESPEC command, in GstarCAD 2025, the "Paste Link" method has added a "DWG Entities" option.

If you select the “DWG Entities” option, the metafile graphics in the Clipboard are converted to GstarCAD objects and copied to the current drawing. If the metafile graphics are not converted, the metafile is displayed as an OLE object.
After inserting the data, selecting the table enables you to edit the row and column spacing of the table object, as well as modify the contents of the table. A data link will also be automatically created and can be updated using the DATALINKUPDATE command.

License Manager Improvement
1.18. 
License Manager Improvement
GstarCAD 2025 introduces key updates to enhance licensing management and security
-
License Expiration Reminder
-
Title Bar Reminder: If you are using a free-trial version, next to the product name, GstarCAD 2025 will display the remaining days of the trial. After expiration, it will display "Expired".
-
Popup Reminder: When the license is due to expire in 1, 7, 30, or 60 days, a popup reminder will appear each time the software is opened on those days, prompting the user to renew the subscription in a timely manner.
-

If "Do not show it again this time" is clicked, the popup will not appear again for the rest of the day.
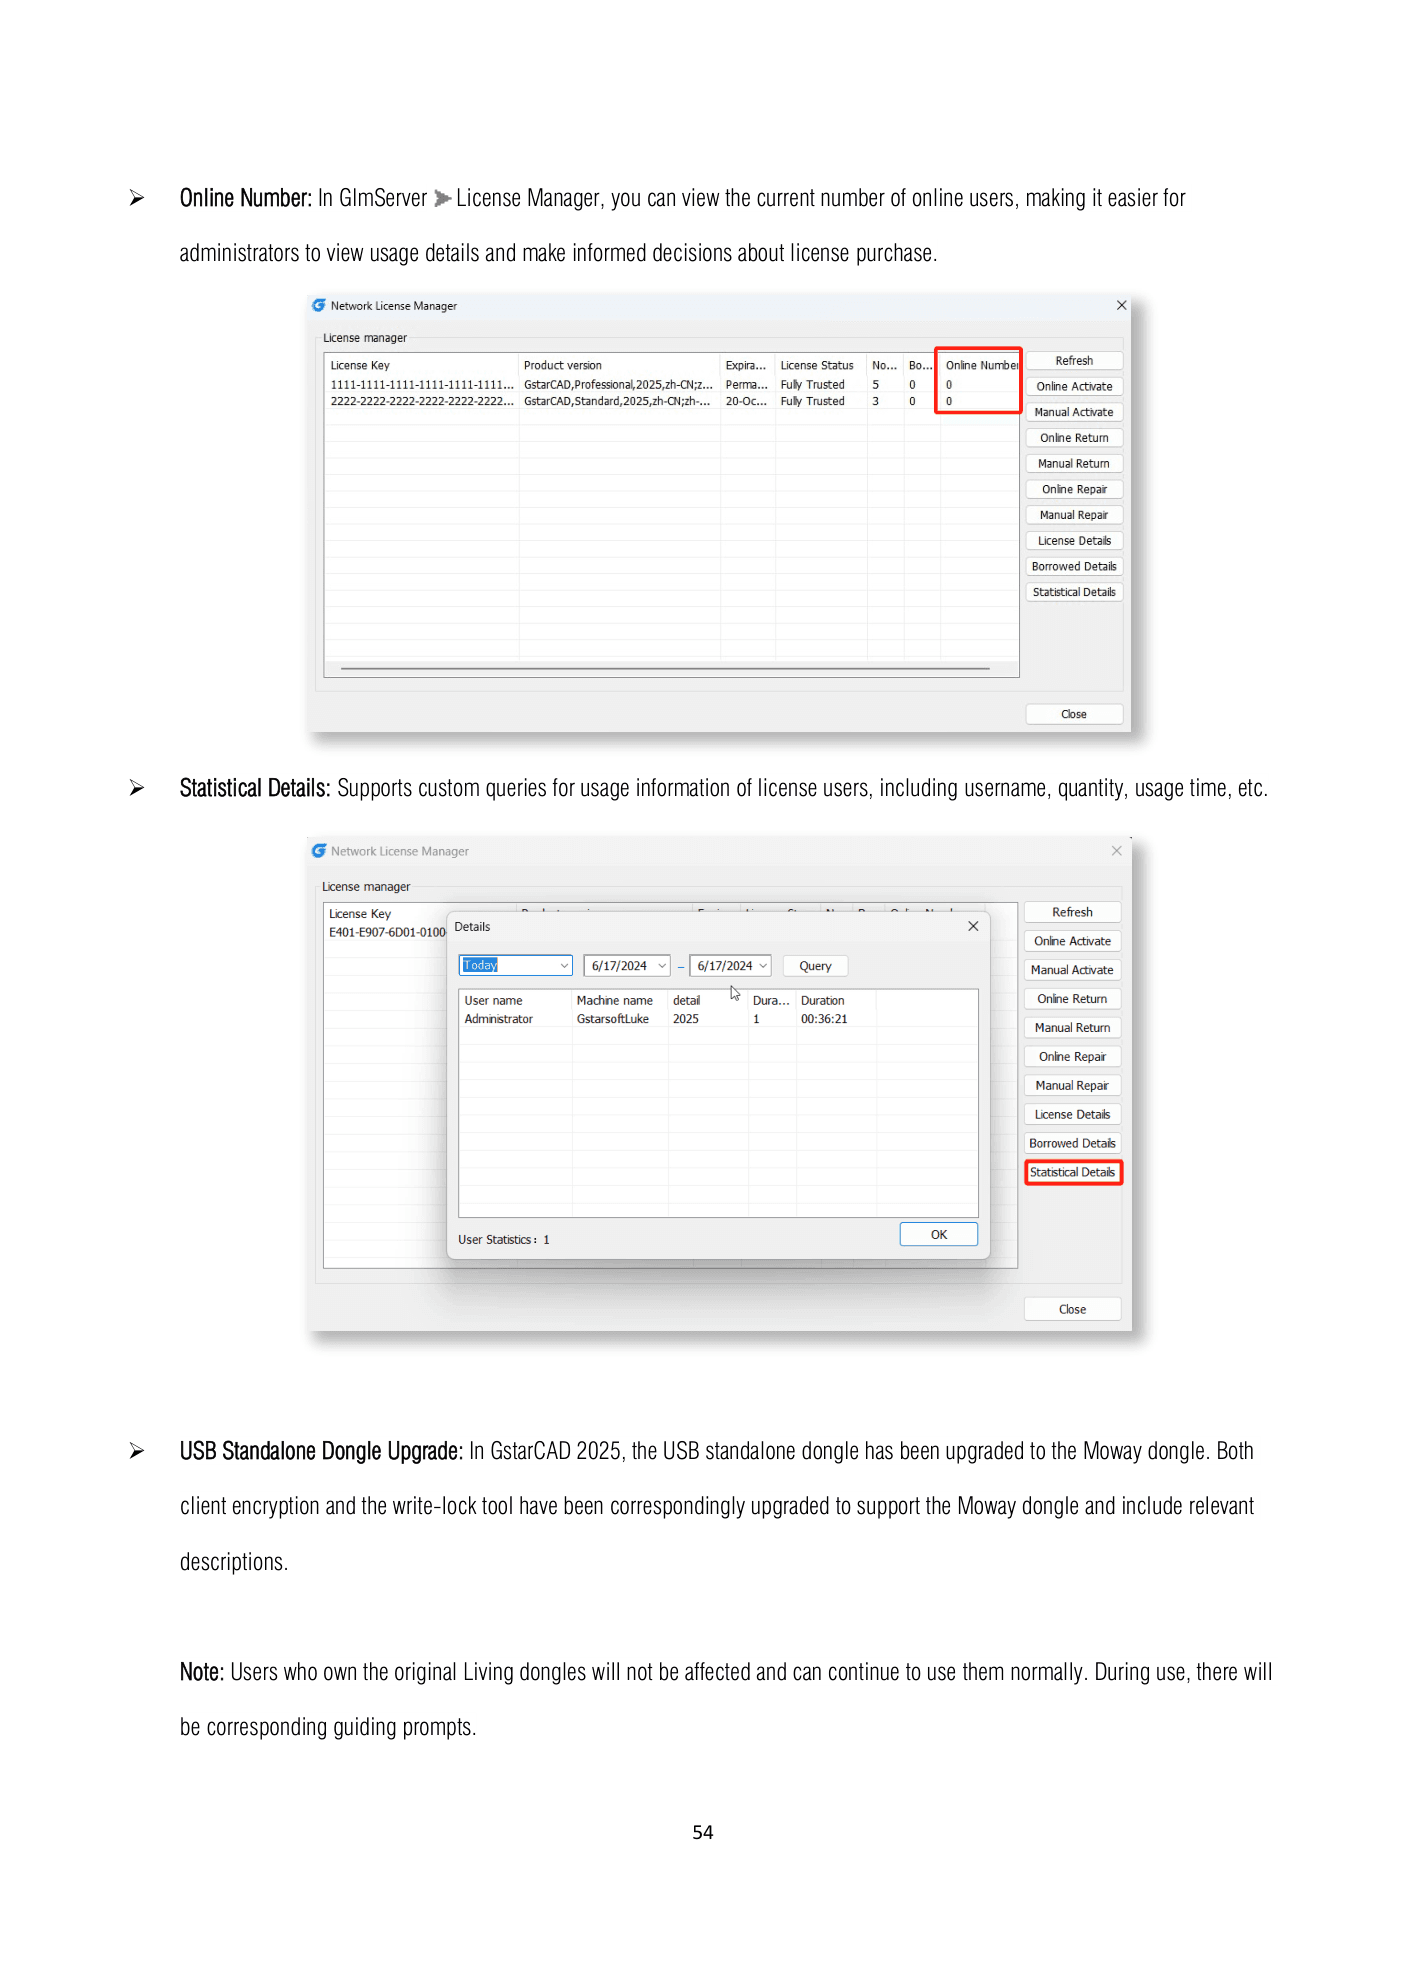
- Online Number: In GlmServer
License Manager, you can view the current number of online users, making it easier for administrators to view usage details and make informed decisions about license purchase.

- Statistical Details: Supports custom queries for usage information of license users, including username, quantity, usage time, etc.

- USB Standalone Dongle Upgrade: In GstarCAD 2025, the USB standalone dongle has been upgraded to the Moway dongle. Both client encryption and the write-lock tool have been correspondingly upgraded to support the Moway dongle and include relevant descriptions.
Users who own the original Living dongles will not be affected and can continue to use them normally. During use, there will be corresponding guiding prompts.

PDF page 3 — additional source text
Operation Response Time
PDF page 3 — additional source text
Operation Response Time
PDF page 3 — additional source text
GstarCAD 2024
GstarCAD 2025
PDF page 4 — additional source text
Operation Response Time
PDF page 4 — additional source text
Operation Response Time
PDF page 4 — additional source text
ZCAD 2025
GstarCAD 2025
PDF page 4 — additional source text
BCAD 2024
GstarCAD 2025