Table
Table function has been required for a while. Finally it is implemented into GstarCAD 2017 now.
Although there was a table function in Express Tool in the old GstarCAD versions and MS EXCEL interactive AutoXlsTable as well, these functions were not compatible with AutoCAD.
The new Table function is AutoCAD-like Table function with TABLEDIT\TABLESTYLE\TABLEEXPORT command group. It is possible now to create and modify table as well as to define the format of table. It is possible to export the table to CVS file and open it on Microsoft Excel.
Insert Table Dialog Box
Input TABLE command and press ENTER, and "Insert Table" dialog box will be open.
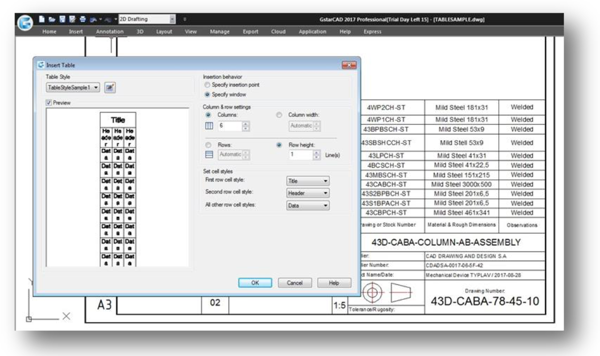
Table Style : Choose a table style from within the current drawing from which to create a table. You can create a new table style by clicking the button next to the drop-down list.
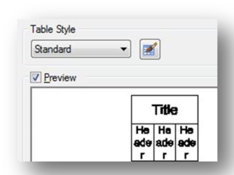
Preview : Controls whether a preview displays. If you start from an empty table, the preview displays an example of the table style.
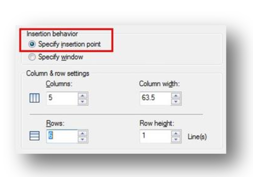
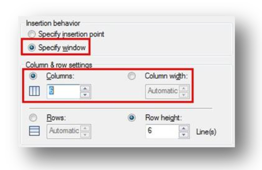
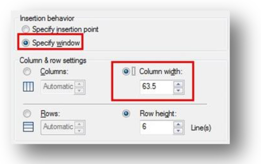
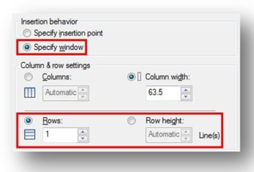
Insertion Behavior : Specifies the location of the table.
Specify Insertion Point : Specifies the location of the upper-left corner of the table. You can use the pointing device or enter coordinate values at the Command prompt. If the table style sets the direction of the table to read from the bottom up, the insertion point is the lower-left corner of the table.
Specify Window : Specifies a size and a location for the table. You can use the pointing device or enter coordinate values at the Command prompt. When this option is selected, the number of columns and rows and the column width and row height depend on the size of the window and the column and row settings.
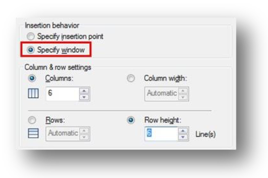
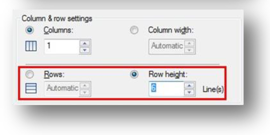
Column & Row Settings : Set the number and size of columns and rows.
Columns Icon : Indicates columns.
Rows Icon : Indicates rows.
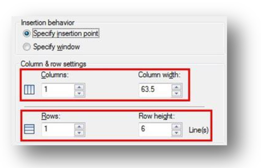
Columns : Specifies the number of columns. When the Specify Window option is selected and you specify a column width, the Automatic option is selected, and the number of columns is controlled by the width of the table. If a table style containing a starting table has been specified, then you can choose the number of additional columns you would like added to that starting table.
Column Width : Specifies the width of the columns. When the Specify Window option is selected and you specify the number of columns, the Auto option is selected, and the column width is controlled by the width of the table. The minimum column width is one character.
Rows : Specifies the number of rows. When the Specify Window option is selected and you specify a row height, the Automatic option is selected, and the number of rows is controlled by the height of the table. A table style with a title row and a header row has a minimum of three rows. The minimum row height is one line. If a table style containing a starting table has been specified, then you can choose the number of additional data rows you would like added to that starting table.
Row Height : Specifies the height of the rows in number of lines. The height of a line is based on the text height and the cell margin, which are both set in the table style. When the Specify Window option is selected and you specify the number of rows, the Auto option is selected, and the row height is controlled by the height of the table.
Set Cell Styles : For table styles that do not contain a starting table, specifies a cell style for rows in the new table.
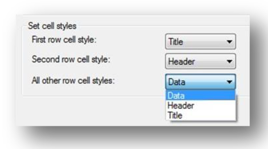
First Row Cell Style : Specifies a cell style for the first row in the table. The Title cell style is used by default.
Second Row Cell Style : Specifies a cell style for the second row in the table. The Header cell style is used by default.
All Other Row Cell Styles : Specifies a cell style for all other rows in the table. The Data cell style is used by default.
Table Style Dialog Box
Current Table Style: Displays the name of the table style that is applied to tables you create.
Styles: Displays a list of table styles. The current style is highlighted.
List: Controls the contents of the Styles list.
Preview: Displays a preview image of the style that is selected in the Styles list. Set Current: Sets the table style selected in the Styles list as the current style. All new tables are created using this table style.
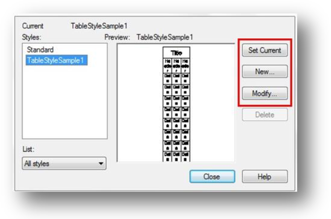
New: Displays the Create New Table Style dialog box, in which you can define new table styles.
Modify: Displays the Modify Table Style dialog box, in which you can modify table styles.
Delete: Deletes the table style selected in the Styles list. A style that is being used in the drawing cannot be deleted.
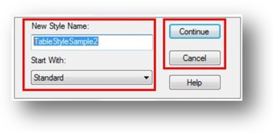
Create New Table Style Dialog Box
Specifies a name for the new table style and specifies the existing table style on which the new table style will be based.
New Style Name : Names the new table style.
Start With : Specifies an existing table style whose settings are the default for the new table style.
Continue : Displays the New Table Style dialog box, in which you define the new table style.
New and Modify Table Style Dialog Boxes
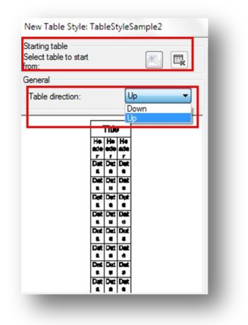
Starting Table : Allows you to specify a table in your drawing to use as an example for formatting this table style. Once you select a table, you can specify the structure and contents you want copied from that table to the table style. With the Remove Table icon, you can remove a table from the current specified table style.
General
Table Direction : Defines a new table style or modifies an existing table style. It sets the direction of a table.
Down : The title row and the column heads row are at the top of the table. Up: The title row and the column heads row are at the bottom of the table.
Preview : Displays an example of the effect of the current table style settings.
Cell Styles : Defines a new cell style or modifies an existing cell style. You can create any number of cell styles.
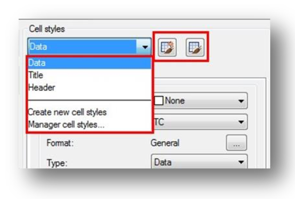
Create Cell Styles Button : Launches the Create New Cell Style dialog box.
Manage Cell Styles Button : Launches the Manage Cell Styles dialog box.
General Tab
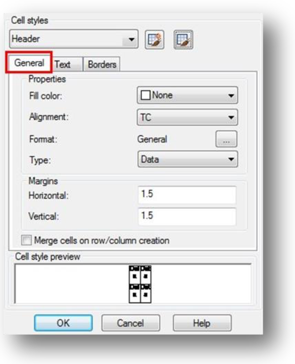
Properties
Fill Color : Specifies the background color of the cell.
Alignment : Sets justification and alignment for the text in the table cell.
Format : Sets data type and formatting for the Data, Column Heading, or Title rows in a table. Clicking this button displays the Table Cell Format dialog box, where you can further define formatting options.
Type : Specifies the cell style as either a tag or data.
Margins
Horizontal : Sets the distance between the text or block in the cell and the left and right cell borders.
Vertical : Sets the distance between the text or block in the cell and the top and bottom cell borders.
Merge cells on row/column creation : Merges any new row or column created with the current cell style into one cell. You can use this option to create a title row at the top of your table.
Text Tab
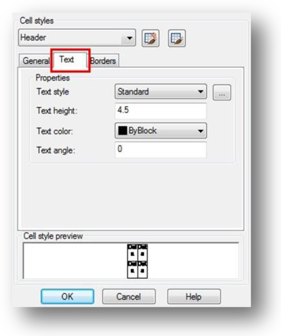
Text Style : Lists the available text styles.
Text Style Button : Displays the Text Style Dialog Box where you can create or modify text styles.
Text Height : Sets the text height.
Text Color : Specifies the color of the text. Choose Select Color at the bottom of the list to display the Select Color dialog box.
Text Angle : Sets the text angle. The default text angle is 0 degrees. You can enter any angle between -359 and +359 degrees.
Borders Tab
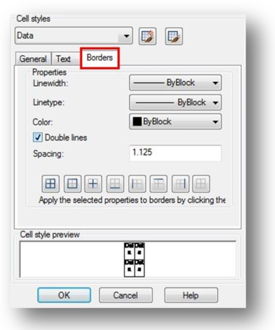
Lineweight : Sets the lineweight to be applied to the borders you specify by clicking a border button. If you use a heavy lineweight, you may have to increase the cell margins.
Linetype : Sets the linetype to be applied to the borders you specify. Choose Other to load a custom linetype.
Color: Sets the color to be applied to the borders you specify by clicking a border button.
Double Line: Displays table borders as double lines.
Spacing : Determines the spacing for double line borders.