GstarCAD 2022 GRX Development Guide
GstarCAD 2022 GRX Development Guide
Contents
- #What is GRX?
- #Development Environment
- #Install GRX SDK
- #Development Instruction
- #How to Use Project Property Sheet File
- #GstarCAD Programming General Method to Adapt 4K Monitor
- #The Differences between GRX and ARX Interface
- #GRX Class Library Description
- #Copyright

What is GRX?
GRX is the RX (Runtime eXtension) programming environment of GstarCAD®, which is the latest application development package released by GstarCAD®. It provides Object-oriented development environment and API on the basic of C++ which can be used to develop GstarCAD application program, extension GstarCAD classes, protocols, and create the new command (the as the build-in command) in GstarCAD.
GRX is compatible with ARX which is developed on AutoCAD® on the Source code level. Developers only need few configurations to migrate ARX application for AutoCAD® to GRX application for GstarCAD.
GRX SDK allows you to directly access GstarCAD database, graphics system and user-defined commands. In addition, the library can be also used with visual LISP and other programming interface.
Developers can accomplish the following work with GRX:
-
Access GstarCAD database
-
Interact with GstarCAD editor
-
Create user interface with MFC
-
Support multiple document environment
-
Create user defined class.
-
Built complex applications.
-
Interact with other programming environment
Development Environment
-
Microsoft Visual Studio Enterprise 2017(Version 15.9.17)
-
CPU:
Basic Requirement:1.6 GHz CUP,Recommend:3.0 GHz CPU and above
- RAM:
Basic Requirement:2 GB,Recommend:8 GB and above
- Operation System
Windows 10 version 1507 and advanced version:Including home version, professional version, education version and enterprise version(not support LTSC and Windows 10 S)
Windows 8.1(with updated 2919355): Core version, professional version and enterprise version
Windows 7 SP1(with latest Windows updated): Including home version, professional version, enterprise version and Ultimate version
- Monitor Resolution:
Traditional monitor:1028 x 800 and above CRT monitor, including 4K (3840 x 2160) monitor
-
GRX SDK 2022
-
GstarCAD 2022
-
.NET Framework 4.8 and above
Install GRX SDK
Download GstarCAD SDK package from our official website: https://www.gstarcad.net/download/
After you get the GRXSDK.ZIP file, please extract it to your disk directory, for instance, C:\grxsdk. Afterwards you will get 6 files, which they are inc,inc-x64,inc-x86,lib-x64,lib-x86 and samples.
-
The Inc file includes header files
-
The inc-x64 file includes the files used in COM and .NET for 64 bit
-
The inc-x86 file includes the files used in COM and .NET for 32 bit
-
The lib-x64 file includes the files referenced from GRX library
-
The lib-x86 file includes the files referenced from GRX library
-
Samples includes project files, they are dotnet,fact_dg,HelloADS,HelloARX,SimplePalette, etc.
The instruction of sample projects:
- Dotnet includes multiple dotnet samples,including addline,hello,vbhello, etc.
-
Addline is the .NET example for adding solid line.
-
Hello is the .NET example for prompting the information of output.
-
Vbhello is the VB.NET example for how to develop with .NET API.
-
fact_dg is the example for defining LSP function.
-
HelloADS is the project sample for how to develop the type of ADS.
-
HelloARX is the sample for how to develop with ARX API.
-
SimplePalette is the sample for how to develop the type modules for palette.
Development Instruction
Create a GRX Project under Win 64-Bit
Run Microsoft Visual Studio 2017
Please click [File] → [New] → [Project]. After clicked the menu Project, the New Project dialog box will pops out. Then select Visual C++ in the catalogue Installed Templates and click [Empty Project].
Input Project Saved Path and Project Name
Input "HelloWorld" at the name label in "New Project" dialog box.

Finish Creating the New Project
Click OK button from the above dialog box to finish creating a new project.
Create a New cpp File
In VS 2017, find the HelloWorld project you have been created in the solution explorer. Select the HelloWorld project and right click on it, then select Add -> New Item. After Add New Item – HelloWord dialog box popped out, select the Code node under Visual C++, then select the C++ File(.cpp) in the middle.


Set the Compile and Link Configuration
Select the project HelloWorld in solution explorer select Property at the right click menu. After selected the Properties option, the HelloWorld Properties Pages will pops out.

- Select General node under the Configuration Properties and set the configurations as below:
Set Target Extension as: .grx
Set Configuration Type as: Dynamic Library (.dll)
Set Character Set as: Use Unicode Character Set
- Select General node under the C/C++ node and set the configurations as below:
Set General-Additional Include Directories as: C:\grxsdk\inc\arx2010
Add a configuration at Preprocessor-Preprocessor Definitions: TOOLKIT_IN_DLL
Please note that if your Configuration is Debug, you have to delete the _DEBUG from the list. Then select Code Generation node under C/C++, and change Runtime Library to Multi-threaded Debug DLL (/MD).
Set Language-Conformance mode as: No
- Select Linker and set the configurations as below:
Set General-Additional Library Directories as (If 32-Bit): C:\grxsdk\lib-x86
Set General-Additional Library Directories as (If 64-Bit):C:\grxsdk\lib-x64
Set Input-Additional Dependencies as:grxport.lib;Td_Root.lib;Td_DbRoot.lib;Td_Db.lib;Td_Ge.lib;Td_Gi.lib;Td_Gs.lib;gcad.lib;gcap.lib;gcdb.lib;gced.lib;gcgs.lib;gcut.lib;gcui.lib
Remark:grxport.lib should be added at the first place.
Set Input-Module Definition File as:C:\grxsdk\inc\arx2010\RxExport.def
-
Click "Apply" and then click "OK" button to finish the compiler and linker configuration.
-
Compile your project and make sure it running without error, otherwise, please repeats the steps above.
Add Codes
Please add the following code to HelloWorld.cpp file.
#include "windows.h"
#include <tchar.h>
#include <arxHeaders.h>
void initApp();
void unloadApp();
void HelloWorld();
void initApp()
{
//register a command with the GstarCAD command mechanism
acedRegCmds->addCommand(_T("HELLOWORLD_CMDS"), _T("Hello"), _T("Hello"), ACRX_CMD_TRANSPARENT, HelloWorld);
}
void unloadApp()
{
acedRegCmds->removeGroup(L"HELLOWORLD_CMDS");
}
void HelloWorld()
{
//print "Hello World" in GstarCAD command line
acutPrintf(_T("\nHello World!"));
}
extern "C" AcRx::AppRetCode gcrxEntryPoint(AcRx::AppMsgCode msg, void *pkt)
{
switch (msg)
{
case AcRx::kInitAppMsg:
acrxDynamicLinker->unlockApplication(pkt);
acrxDynamicLinker->registerAppMDIAware(pkt);
initApp();
break;
case AcRx::kUnloadAppMsg:
unloadApp();
break;
default:
break;
}
return AcRx::kRetOK;
}
Compile Programming
Click Visual Studio 2017 menu item [Build] » [Build solution], then you will get a “HelloWorld.grx” file from C:\GRX\HelloWorld\Release directory.
Run Program
Run GstarCAD and input “appload” at the command line, or select the menu item [Tools] » [loading applications], there will be a [load application files] dialog box. Click Load and find the generated file “HelloWorld.grx” to load it.

Input "hello" at command line, the “Hello World!” will output at command line.


GRX Program with MFC Library
Run Microsoft Visual Studio 2017 (2)
Please click [File] → [New] → [Project]. After clicked the menu Project, the New Project dialog box will pops out. Then select Visual C++ in the catalogue Installed Templates and choose MFC/ATL in the pull down list. Then click MFC Dynamic-Link Library (DLL).
The following is a sample to create a "SimplePalette" project.
Input Project Saved Path and Project Name (2)
Input "SimplePalette" at the name label in "New Project" dialog box, as shown below.

Choose DLL Type
1.2.3. 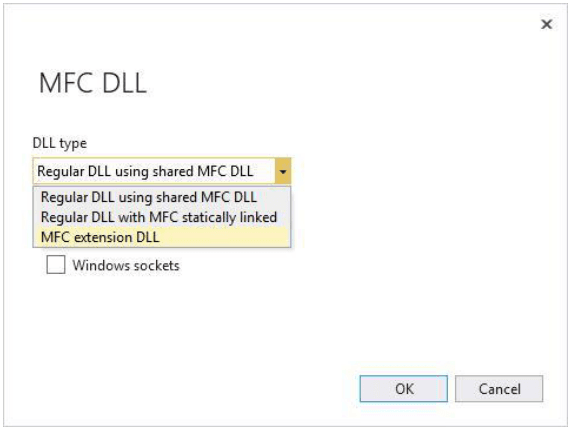
Choose DLL Type
Click OK button, the "MFC DLL" dialog box will pups out. Please select "MFC Extension DLL" and click OK button.
Finish the Project Creation
Click OK button, which means a new project has been created.
Create a New Resource and Corresponding Class
In VS 2017, find the Resource View and select SimplePalette.rc, click Add Resource on right click menu. Select dialog and click New at Add Resource dialog box as shown bleow. Select IDD_DIALOG1 on Resource View and right click on it, then select Properties to change ID as IDD_DIALOG_PALETTE. Right click the dialog you just created, and select Properties. Change Border as None and Style as Child. Afterwards edit control and button from Toolbox (Ctrl+Alt+X). Change the properties of button caption as Check and ID as IDC_BUTTON_CHECK.


Select the dialog and right click on it, then select the Add Class. Set Class Name as CDlgPalette and click the OK button.


Create Three New C++ Class Files
Select the project SimplePalette in solution explorer of VS2017 and right click to add class. Set the name of the class as CFirstPalette, CSecondPalette and CSimpleBar respectively, and set the Base class as CAdUiPalette, CAdUiPalette and CAdUiPalette respectively.


Add Codes (2)
Add code below into the bottom of the file stadfx.h(If VS 2017 version is highter than 15.9.17, it will generate a pch.h head file which is similar to stdafx.h head file), you can find it at Head File in Solution Explore.
#include <arxHeaders.h>
Class code for CDlgPalette, CFirstPalette, CSecondPalette and CSimpleBar could refer to DlgPalette, FirstPalette, SecondPalette and SimpleBar files from example program (C:\grxsdk\samples\SimplePalette).
Add the following code to SimplePalette.cpp file:
#include "stdafx.h"
#include "SimpleBar.h"
CSimpleBar* gpBar = NULL;
static void doIt()
{
if (gpBar)
{
gpBar->ShowPane(TRUE, FALSE, TRUE);
}
else
{
acedInitGet(0, L"Float Dock");
ACHAR result[132] = {0};
int rc = acedGetKword(L"\nFloat or Docking?", result);
bool bFloat = true;
if (rc == RTNONE)
{
bFloat = true;
}
else if (rc != RTNORM)
{
return;
}
else
{
bFloat = _wcsicmp(result, L"Float") == 0;
}
CSize sizeDefault(200, 450);
CRect rcDefault(CPoint(150,200), sizeDefault);
gpBar = new CSimpleBar;
gpBar->SetMinSize(sizeDefault);
DWORD dwStyle = WS_CHILD | WS_VISIBLE | CBRS_SIZE_DYNAMIC | CBRS_GRIPPER;
if (bFloat)
{
dwStyle |= CBRS_FLOATING;
}
else
{
dwStyle |= CBRS_RIGHT;
}
gpBar->Create(L"Simple", dwStyle,
rcDefault, acedGetAcadFrame());
gpBar->EnableDocking(CBRS_ALIGN_LEFT | CBRS_ALIGN_RIGHT | CBRS_ALIGN_BOTTOM);
if (bFloat)
{
gpBar->FloatPane(rcDefault, DM_SHOW, true);
}
else
{
acedGetAcadFrame()->DockPane(gpBar);
}
}
}
void initApp()
{
acedRegCmds->addCommand(_T("ASDK_SAMPLES_SIMPLEPALETTE"),
_T("ASDK_SIMPLEPALETTE"), _T("SIMPLEPALETTE"), ACRX_CMD_MODAL,
doIt);
}
void unloadApp()
{
acedRegCmds->removeGroup(_T("ASDK_SAMPLES_SIMPLEPALETTE"));
if (gpBar)
{
gpBar->DestroyWindow();
delete gpBar;
gpBar = NULL;
}
}
extern "C" AcRx::AppRetCode
acrxEntryPoint(AcRx::AppMsgCode msg, void* appId)
{
switch(msg) {
case AcRx::kInitAppMsg:
acrxDynamicLinker->unlockApplication(appId);
acrxDynamicLinker->registerAppMDIAware(appId);
initApp();
break;
case AcRx::kUnloadAppMsg:
unloadApp();
}
return AcRx::kRetOK;
}
Set Compile and Link Item
- Select the project SimplePalette in solution explorer select Property at the right click menu. After selected the Properties option, the SimplePalette Properties Pages will pops out.

- Select General node under the Configuration Properties and set the configurations as below:
Target Name set to:.grx
Configuration Type set to:Dynamic Library (.dll)
Character Set set to: Use Unicode Character Set
- Select General node under the C/C++ node and set the configurations as below:
Set General-Additional Include Directories as: C:\grxsdk\inc\arx2010
Add a configuration at Preprocessor-Preprocessor Definitions: TOOLKIT_IN_DLL
Please note that if your Configuration is Debug, you have to delete the _DEBUG from the list. Then select Code Generation node under C/C++, and change Runtime Library to Multi-threaded Debug DLL (/MD).
Set Language-Conformance mode as: No
- Select Linker and set the configurations as below:
Set General-Additional Library Directories as (If 32-Bit): C:\grxsdk\lib-x86
Set General-Additional Library Directories as (If 64-Bit):C:\grxsdk\lib-x64
Set Input-Additional Dependencies as:grxport.lib;Td_Root.lib;Td_DbRoot.lib;Td_Db.lib;Td_Ge.lib;Td_Gi.lib;Td_Gs.lib;gcad.lib;gcap.lib;gcdb.lib;gced.lib;gcgs.lib;gcut.lib;gcui.lib
Remark:grxport.lib should be added at the first place.
Set Input-Module Definition File as:C:\grxsdk\inc\arx2010\RxExport.def
-
Click "OK" button to finish the compiler and linker configuration.
-
Compile your project and make sure it running without error, otherwise, please repeats the steps above.
Compile Programming (2)
Click Visual Studio 2017 menu item [Build] » [Build solution], then you will get a “SimplePalette.grx” file from C:\GRX\ SimplePalette \Release directory.
Run Program (2)
Run GstarCAD and input “appload” at the command line, or select the menu item [Tools] » [loading applications], there will be a [load application files] dialog box. Click Load and find the generated file “SimplePalette.grx” to load it.

Input "simplepalette" in command line, the “Float or Dock?” will output at command line. Press Enter on keyboard and the palette will be shown at GstarCAD workspace.


How to Use Project Property Sheet File
Project Property Sheet File is used to quick set the project configurations for the new project. It can avoid to modify project property by mistake. The project properties can be independently applied to generate the configuration (debug or release) and target platform (Win32, x64 or ARM) in any combination.
GRX SDK provides the additional dependencies which contain the project property sheet files for directory and additional library directories.
- Use Project Property sheet to reset the configuration, we can take" HelloWorld" project as a sample. Open "HelloWorld" project, click [View] » [Other Windows] » [Properties Manager], as shown below.

- In "Properties Manager "dialog box, right click on Release| x64, and then click Add Existing Property Sheet, as shown below.

-
Add C:\grxsdk\inc\arx2010\arx.props property sheet file (this file contains dbx.props property sheet file, and add Td_Root.lib;Td_DbRoot.lib;Td_Db.lib;Td_Ge.lib;Td_Gi.lib;Td_Gs.lib to Additional Dependencies). Add C:\grxsdk\inc\arx2010\rxsdk_releasecfg.props with the same steps(this file contains rxsdk_common.props property sheet file and add ”Additional Include Directories and Additional Libray Directories"). In addition, C:\grxsdk\inc\ arx2010\rxsdk_debugcfg.props is necessary if under debug project.
-
In Visual Studio 2017 "Solution Explore", right click on the “HelloWorld” project, and click Properties at context menu. Click C/C++,and then click General, change the Additional Include Directories to C:\grxsdk\inc\arx2010. Click Linker and click Input, change Additional Dependencies to grxport.lib, change Module Definition File to C:\grxsdk\inc\arx2010\RxExport.def
-
Then Compile.
GstarCAD Programming General Method to Adapt 4K Monitor
Development Background and Target
GstaCAD provides implementation method to support 4K monitor.
Implementation Method
Dialog Box, User-Defined Window, Control Adaptive
-
For all the User-defined window, dialog box and control in the program, it is no needs to adapt if they are from resource manage. Only the ones which have been modified through module need to be adapt. For example, If the button has been stretched by 5 units, then the “5” here should be adapted. You can use the interface " int GdUiGetCtrlDPISize(const int val)" to adapt this kind of module. Input the module value and the returned value is the adapted result. Replace the original module with GdUiGetCtrlDPISize (module). The interface is in gcui, and the project needs to rely on gcui.lib when using it.
-
For custom Combox and Listbox class.ect, if they do not have 4k adaptation effect, then the MeasureItem interface needs to be rewritten. Realized the original height of the controls can be adjusted to 4k effect in the logic. For example:
lpMeasureItemStruct->itemHeight = GdUiGetCtrlDPISize(lpMeasureItemStruct->itemHeight);
Image Adaptation
If the UI bitmap has not been adapted for 4 k monitor, you need to use the interface “void GdUiScaleBitmapDPI (CBitmap * pBitmap, CBitmap & bitmapNew)”. The export parameter bitmapNew will return the images after adaptation.
The Differences between GRX and ARX Interface
Interface for “Plot”
When load Plot interface, the begin Document function in GRX will call beginPage function automatically. Meanwhile, the beginPage will call beginGenerateGraphics function automatically. Which means when you need to load Plot interface, you don’t need to call beginPage, beginGenerateGraphics, endGenerateGraphics and endPage functions any more. Use the GCAD_CORE macro to distinguish the different uses of GRX and ARX as shown below.
Example:
AcPlPlotEngine* mPlotEngine;
es = AcPlPlotFactory::createPublishEngine(mPlotEngine);
es = mPlotEngine->beginPlot(NULL);
AcPlPlotInfo plotInfo;
AcPlPlotInfoValidator plotInfoValidator;
plotInfo.setLayout(mPlotSettings->id());
plotInfo.setOverrideSettings(mPlotSettings);
plotInfoValidator.setMediaMatchingPolicy(AcPlPlotInfoValidator::kMatchEnabled);
es = plotInfoValidator.validate(plotInfo);
es = mPlotEngine->beginDocument(plotInfo, curDoc()->fileName(), NULL,1, true, _T("c:\\test.eps"));
#ifndef GCAD_CORE
AcPlPlotPageInfo pageInfo;
es = mPlotEngine->beginPage(pageInfo, plotInfo, true);
es = mPlotEngine->beginGenerateGraphics();
es = mPlotEngine->endGenerateGraphics();
es = mPlotEngine->endPage();
#endif
es = mPlotEngine->endDocument();
es = mPlotEngine->endPlot();
mPlotEngine->destroy();
AcGsView::add() Realized by Different Method
AcGsView::add()realized by different method,Use GCAD_CORE macro to distinguish GRX and ARX usage.
Example:
Acad::ErrorStatus initDrawingCtrl(AcDbDatabase *pDb,const TCHAR *chSpace)
{
// have we got a valid drawing
if (NULL == pDb)
{
return Acad::eNullBlockName;
}
// initialize the preview control
mPreviewCtrl.init();
mPreviewCtrl.SetFocus();
AcDbBlockTableRecordPointer bptr(chSpace, pDb, AcDb::kForRead);
AcDbObjectId idCurrenVs;
// set the view to the Active AutoCAD view
idCurrenVs = SetViewTo(mPreviewCtrl.mpView, pDb, m_viewMatrix);
// tell the view to display this space
mPreviewCtrl.view()->add(bptr, mPreviewCtrl.model());
mPreviewCtrl.view()->setVisualStyle(idCurrenVs);
return Acad::eOk;
}
#ifdef GCAD_CORE
AcGePoint3d ptMin ( 1e20, 1e20, 1e20);
AcGePoint3d ptMax ( -1e20, -1e20, -1e20);
m_tempExt.set ( ptMin , ptMax ) ;
OdDbDatabasePtr pDb = acdbHostApplicationServices()->createDatabase();
initDrawingCtrl(pDb,L"*Model_Space");
#else
m_tempExt.minPoint().set(1e20, 1e20, 1e20);
m_tempExt.maxPoint().set(-1e20, -1e20, -1e20);
AcDbDatabase* pDb = new AcDbDatabase;
initDrawingCtrl(pDb,L"*Model_Space");
#endif
CAdUiPaletteSet Class Implementation is Different from ARX
Migrating ARX code to GRX, an error is reported when compiling the code and the error prompts that the CFrameWnd::ShowControlBar parameter list does not match.
It is recommended to use the GCAD_CORE macro to distinguish the different usages of GRX and ARX.
Example:
extern CPaletteSetWnd *glo_pMainWnd;
void SampleCmd()
{
if (glo_pMainWnd == NULL)
{
glo_pMainWnd=new CPaletteSetWnd;
if (glo_pMainWnd != 0)
{
CSize sizeDefault(200, 450);
CRect rcDefault(CPoint(150, 200), sizeDefault);
DWORD dwStyle = WS_CHILD | WS_VISIBLE | CBRS_SIZE_DYNAMIC | CBRS_GRIPPER;
dwStyle |= CBRS_FLOATING;
glo_pMainWnd->Create(_T("Main ..."),dwStyle,rcDefault,acedGetAcadFrame());
glo_pMainWnd->EnableDocking(CBRS_ALIGN_LEFT|CBRS_ALIGN_RIGHT);
glo_pMainWnd->RestoreControlBar();
#ifdef _GRX_APP // GstarCAD
CMDIFrameWndEx *mdifwCurrent=acedGetAcadFrame();
if (mdifwCurrent != 0)
mdifwCurrent->DockPane(glo_pMainWnd);
#else // AutoCAD
acedGetAcadFrame()->ShowControlBar(glo_pMainWnd, TRUE, FALSE);
#endif
}
else
{
#if defined(_GRX_APP) // GstarCAD
glo_pMainWnd->ShowPane(TRUE, FALSE, TRUE);
#else // AutoCAD
acedGetAcadFrame()->ShowControlBar(glo_pMainWnd, TRUE, FALSE);
#endif
}
}
}
The CPaletteSetWnd is a panel derived class
class CPaletteSetWnd : public CAdUiPaletteSet
{
......
}
You can also refer to the example in grxsdk\sample\ SimplePalette under the SDK development kit
GRX Class Library Description
The following libraries are frequently used in GRX. These libraries have the same effect with the corresponding libraries under ARX, mainly including::
-
GcRx- is same with the AcRX library, which is used to bind an application and register and identify for the running class.。
-
GcEd- is same with the AcEd library, used to register custom commands and event notifications.
-
GcDb-is same with AcDb library, it’s GstarCAD database class.
-
GcGi- is same with the AcGi library and is used for the graphics class of GstarCAD.
-
GcGe- is same with the AcGe library, and is used for general linear algebra calculation and application classes of geometric objects.
GcRx
The GcRx class library is used for DLL initialization and the system level for running class registration and identification. It provides the functions below:
-
Class identification and inheritance analysis of object runtime.
-
Add a new protocol to an existing class at runtime.
-
Object equality and composition judgment.
-
Object copy.
GcEd
The GcEd class library is used to define and register new GstarCAD commands, which are the same as GstarCAD internal/original commands.
GcDb
The GcDb class library represents the classes that build up the GstarCAD database. The database stores the information of all graphic objects. These graphic objects are called “Entities”. These graphic objects and non-graphic entities (such as layers, line types, and text styles) constitute GstarCAD graphics.
GcGi
GcGe library provides the graphic interface which is used to draw CAD entities.
GcGe
GcGe library provides some geometric tools (e.g., vector and matrix) to perform the 2D and 2D geometric operations, it also provides the basic geometric objects, such as point, curve and surface.
Copyright
Copyright reserved: Gstarsoft Co.,Ltd
Usage License: Allows copying, quote any part of this document. Changes of any part of this document are forbidden without authorization. Please keep this statement when copying and quoting it, otherwise it will be held liable.
- AutoCAD® is a product of Autodesk® Company which is one of the CAD software solution providers. ARX is an abbreviated name of ObjectARX, which is AutoCAD® Runtime eXtension, and C++ SDK provided by Autodesk®